Getting To Grips With The Core Media IO Camera Extension, a 3 part series. #
Part 2 of 3: Creating a useful software Core Media Camera Extension, interprocess communication, and painless debugging. #
View project on Github #
Welcome to the second in a series of three posts about the Core Media IO Camera Extension.
Please take a look at the previous post, “The Basics”, to learn what the series is about, its prerequisites, etc, and to understand the project so far.
The second post, this one, is about creating a useful software CMIO Camera Extension with communication between a configuration app and an extension, and painless extension debugging,
The last will be about bringing it all together by **building a creative camera with realtime effects processing using vImage Pixel Buffers, which can use the Continuity Camera Webcam**.
Let’s jump in. In part 1, we created a known-working basic software CMIO Camera Extension camera with a container app which could install it, that we could use in FaceTime in order to watch a white stripe move up and down. You can view or clone my version of it, keeping in mind that you will need to change all references to my organization ID (com.politepix) and my team ID to match your own, or it definitely won’t work. Ideally you have your own that you made in the previous post and it is still working, so we can continue with it here.
We are going to examine three more fairly buttoned-down topics today that will leave us prepared to get satisfyingly weird in part 3, coming up next. They are:
- Interprocess communication between a container app and the extension it installs (i.e. how to turn the installer app into a configuration app),
- Creating a simple software CMIO Camera Extension that can do something slightly more useful than the white line,
- How to happily debug your extension, so you don’t have to see your own debug-hell facial expression on the screen every time you test a camera feed.
Pick up where we left off #
As we’ve seen, Core Media IO Camera Extensions use a container app to install an extension. What if you need to tell the extension to change something? This idea of app-to-extension communication is mentioned in the CMIO Extension WWDC22 video.
The container app can become a configuration app by using some form of interprocess communication. The app is a process and the extension is a separate process, so their code doesn’t speak to each other directly, and in fact, there is no reason to assume they will both be an active process simultaneously — the user can effectively choose to load one process, the other, both, or none. The WWDC video states that the extension is run by a different user role account than the user’s account, for security. They are genuinely separate.
What I really wanted to show you was how to share an App Group UserDefaults between the container app and the extension, and then use CFNotification to message between them. This covers many cases and it also encourages an uncoupled communication design.
The docs indicate that using UserDefaults initialized with UserDefaults(suiteName:) in a shared App Group container is supported, and we have an App Group, and I have seen it work in some OS versions. But, after a bit of time examining my results with those UserDefaults across different betas and current OS versions, I have the feeling that how it’s “supposed” to work is in flux right now, and I suspect I could be sharing code with a very short expiration date.
Then I thought I’d show you some simple XPC instead, but it currently raises the same “is this supposed to be like this?” questions as UserDefaults. Well, this is a new way of distributing these extensions, so we can expect some bumps and changes.
Anyway. Let us not chase waterfalls; let us stick to the CFNotifications we are used to. I think I’ll come back and revise this to include sharing data once Ventura has settled down into later betas. In part 3, we’ll add an additional form of configuration via custom properties, but right now we’ll keep it simple.
Notifications (and Logger) #
Let’s add some notification code that lets us communicate from the container app to the extension without ambiguity.
First, let’s add a file we will share with both targets. Xcode->File->New-File->Swift File and call it NotificationName.swift.
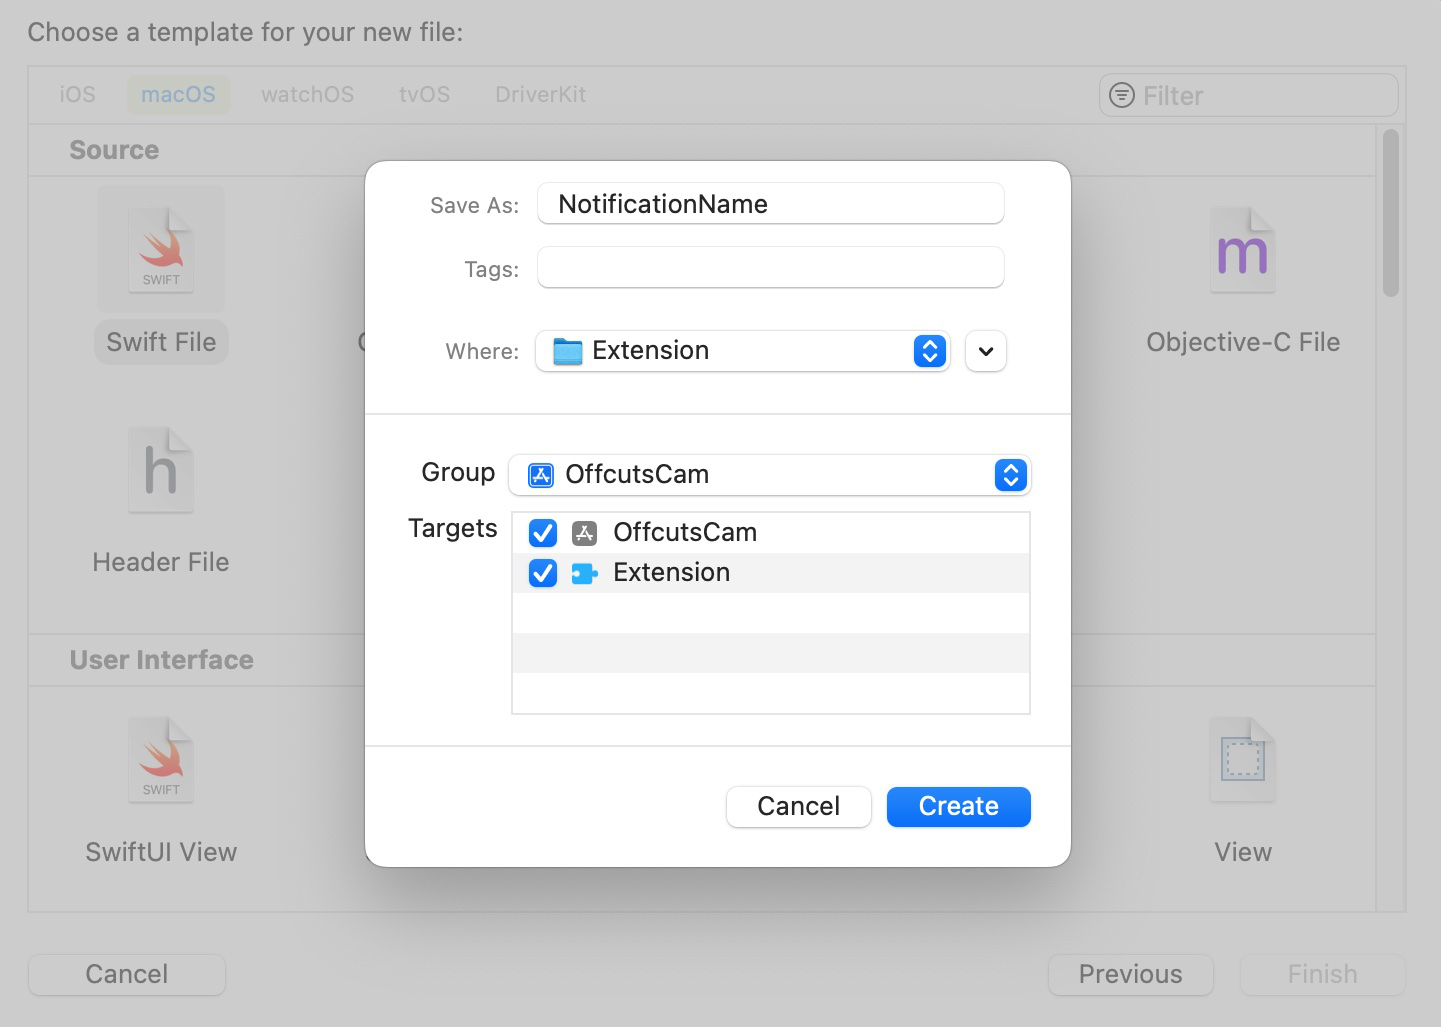
When creating it, make sure to add it to both app and extension targets. This should be its contents (but with your team ID and organization ID):
import Foundation

enum NotificationName: String, CaseIterable {
    case changeImage = "Z39BRGKSRW.com.politepix.OffcutsCam.changeImage"
    // add more cases later like this one, changing the case `changeImage` and the substring "changeImage" to a different notification name you want to pass.
}
Next, add this import to ContentView.swift:
import OSLog
Right under it, we’ll create a unified logging API logger (please also check out this indispensable post about making the system log work for you). In a project that was less of a demonstration, there are several ways we could do this that would be more design-correct. But I’d like to show this with minimal indirection, so we’ll create a global here in the file where we’re doing the work:
let logger = Logger(subsystem: "com.politepix.offcutscam", category: "Application")
Add this new function to your SystemExtensionRequestManager class in ContentView.swift of the container app, substituting your own IDs where you see mine:
func postNotification(named notificationName: NotificationName) {
    logger.debug("Posting notification \(notificationName.rawValue) from container app")

    CFNotificationCenterPostNotification(
        CFNotificationCenterGetDarwinNotifyCenter(),
        CFNotificationName(notificationName.rawValue as NSString),
        nil,
        nil,
        true
    )
}
By using our Logger instead of print(...), we can see our logging in Console.app, which is going to be one of the three legs of our extension debugging strategy. We’re using Logger.debug as our logging level because we don’t want this logging to persist in the OS. Other options would be info (doesn’t persist unless implicated in an error) or error (persists), and more.
Add this UI to the top of ContentView’s view:
Button(action: {
    systemExtensionRequestManager
        .postNotification(
            named: NotificationName.changeImage
        )
}) {
    Text("Change Image")
}
.padding()
If you build and run the container app now, you will see a button, and if you click it, it will post a notification and you should be able to see the logger.debug(...) line logged in Xcode. You can see the beginning of a design, where we add new notifications in NotificationName and call them, due to interactions, with postNotification(named:) using the cases of the NotificationName enum.
Now we will set up receiving notifications in the extension.
First, add a logger to the top of the file:
let logger = Logger(subsystem: "com.politepix.offcutscam", category: "Extension")
You can see that we have a different category for the extension, which will let us view both app and extension logging under the shared subsystem in Console.app, but view either exclusively using the category.
Add the following to your extension’s ExtensionProviderSource in ExtensionProvider.swift:
    private let notificationCenter = CFNotificationCenterGetDarwinNotifyCenter()
    private var notificationListenerStarted = false
In ExtensionProviderSource init() function, add this line right after super.init():
startNotificationListeners()
and after the init, in the same module, add these new functions:
deinit {
    stopNotificationListeners()
}


private func notificationReceived(notificationName: String) {
    guard let name = NotificationName(rawValue: notificationName) else {
        return
    }

    switch name {
    case .changeImage:
        logger.debug("The camera extension has received a notification")
        logger.debug("The notification is: \(name.rawValue)")
    } // This switch will complain about missing cases as you add new notifications to the  NotificationName enum. The system works!
}

private func startNotificationListeners() {
    for notificationName in NotificationName.allCases {
        let observer = UnsafeRawPointer(Unmanaged.passUnretained(self).toOpaque())

        CFNotificationCenterAddObserver(CFNotificationCenterGetDarwinNotifyCenter(), observer, { _, observer, name, _, _ in
            if let observer = observer, let name = name {
                let extensionProviderSourceSelf = Unmanaged<ExtensionProviderSource>.fromOpaque(observer).takeUnretainedValue()
                extensionProviderSourceSelf.notificationReceived(notificationName: name.rawValue as String)
            }
        },
        notificationName.rawValue as CFString, nil, .deliverImmediately)
    }
}

private func stopNotificationListeners() {
    if notificationListenerStarted {
        CFNotificationCenterRemoveEveryObserver(notificationCenter,
                                                Unmanaged.passRetained(self)
                                                    .toOpaque())
        notificationListenerStarted = false
    }
}
This shows that we are going to listen for a notification that the app is sending to CFNotificationCenterGetDarwinNotifyCenter and get it into a switch case of our NotificationName enum.
If we could see extension logging in Xcode, we would run our extension and press the container app button to see if communication is working, but we can’t log the extension output to Xcode.
It is necessary to install and activate the extension and open Console.app, and that will allow us to view all of our unified logging output that we wrote with our logger in the console.
I mentioned at the end of part 1 that we were going to get around the necessity to constantly reboot in order to debug, and we are, but to get there we’re going to need to do a reboot, so we can first see what it is like to debug a camera extension the hard way.
systemextensionsctl #
There is a handy CLI tool called systemextensionsctl and let’s open Terminal.app and use it to check the current status of our extension. Run systemextensionsctl list to see the current state of the user-installed system extensions on your system. If you installed your extension and never uninstalled it, it will look something like this:
* * Z39BRGKSRW com.politepix.OffcutsCam.Extension (1.0/1) Extension [activated enabled]
If you haven’t already done so, build and run /Applications/OffcutsCam.app and press the Uninstall button to uninstall your previous version of the extension. Now systemextensionsctl list will look like this:
Z39BRGKSRW com.politepix.OffcutsCam.Extension (1.0/1) Extension [terminated waiting to uninstall on reboot]
It is telling you that the extension isn’t going to be fully uninstalled until after a reboot – there are no live replacements of an extension process in a single user session. So reboot. After your system comes back up, build and run the container app in Xcode, and install your new extension version in the container app.
Viewing our logging in Console.app #
After you have successfully installed it, open Console.app and click Start Streaming. You will see a lot of messages. In the search filter field in the upper right, enter com.politepix.offcutscam (but with your organization ID) so we can look for messages about or from our extension and app. There is a dropdown in the filter field next to your search token, and let’s set it to Subsystem, so we are only receiving output from our logger.
Now that we have quieted things down, we will go to Console.app->Action->View Debug Messages and check that so we can see our debug-level logging. You will probably want to turn this off after you’re done debugging your extension because it’s intolerably noisy if you ever need to look at OS events.
Next, we want to actually load our extension, so let’s open FaceTime and select our camera. The extension process isn’t going to load unless an app uses the camera.
Now that the camera extension is loaded, if we run the app and click the Change Image button, we will see our debug logging in Console.app. Since we’re filtering there on our shared subsystem, we see logging from the app and the extension. If we add a filter in the search field of Console.app for Extension and set its type to Category we will only see the extension output. If we used the category Application instead, we would only see the app output.
Tip: when you are debugging an extension by observing Console.app logging, you should occasionally filter by the extension name as a regular “contains” string and not only by the subsystem you set to catch your own debug output. Why? Because another app or process might be the one complaining about your extension process, and that may be where you get the info you need to solve a bug.
So, we can now do part of our debugging with Console.app, but we don’t yet know how to avoid reboots to examine code. To start dismantling the reboot industrial complex, the next tool in our toolbox will be lldb.
Doing something useful #
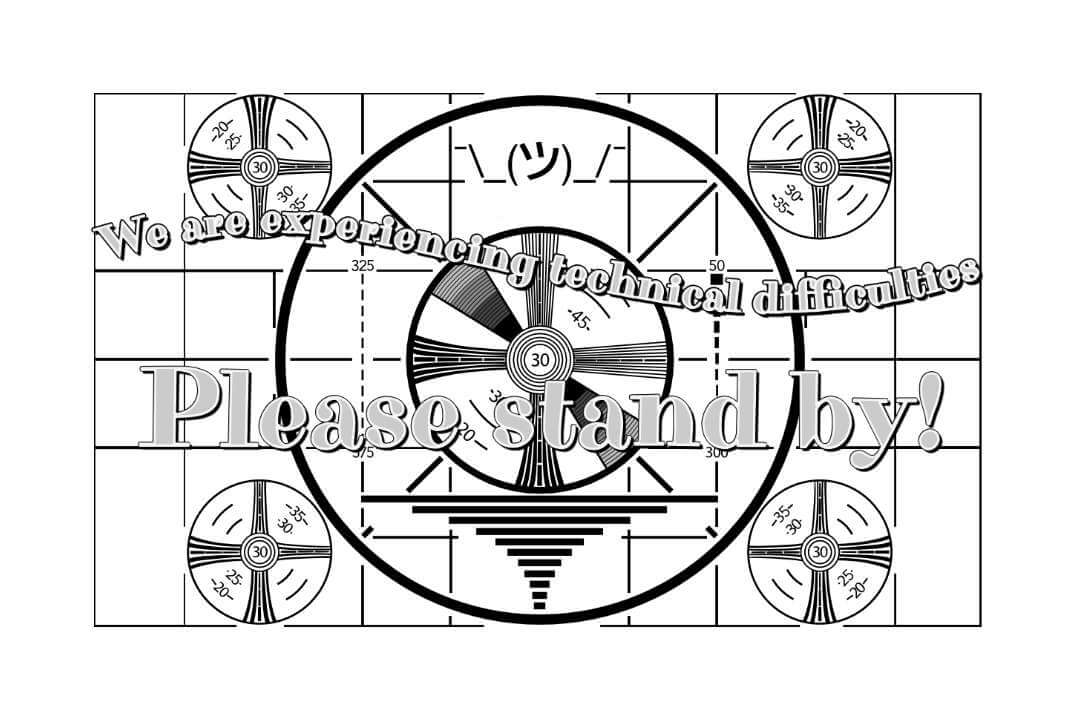
But first, let’s change what the software camera does. When I think back on our new age in which we have each become our own live video broadcast studios, I think, not of the countless video meetings which went relatively smoothly, but about the few that went so strangely that they are now embedded in the culture.
You know, this guy trying in vain to talk about South Korea while his awesome kid rocks up like she’s going to start dropping science, or this lawyer who became, irreversibly, a cat, or the very many incidents of wardrobe malfunction.
When something went wrong in the news studio, they could always cut to the “Technical Difficulties” placard in the most dire cases. We as individuals deserve at least this much dignity. We will make a “We’ve Having Technical Difficulties” software camera so that when things get weird, you too can cut away.
Download this image and this image, and add them to your extension target.
Build and run the app, and then verify that these images will be available to your extension bundle by opening Terminal.app and running
open /Applications/OffcutsCam.app/Contents/Library/SystemExtensions/com.politepix.OffcutsCam.Extension.systemextension/Contents/Resources so you can see if they’re both in there. If not, try building the extension directly in Xcode and then going back to building and running the application (this shouldn’t be necessary, but it helped with this issue once in my experience, so give it a try). If you still don’t have the images at the necessary location, troubleshoot whether you really added them to the extension target. Once you see them, proceed.
OK, let’s open ExtensionProvider.swift. First, change the framerate at the top of the file to 1. We are going to show a static image, so we don’t need to burn fuel by refreshing it 60x/sec:
let kFrameRate: Int = 1
Change the video dimensions from this:
let dims = CMVideoDimensions(width: 1920, height: 1080)
to this:
let dims = CMVideoDimensions(width: 1080, height: 720)
If we recall from the explanation of ExtensionProvider.swift from part 1, the business code for creating the actual content that gets to the client app using the camera extension, in Apple’s example code, is in func startStreaming() of ExtensionDeviceSource. This is where a pixel buffer is prepared to be handed off to the object conforming to CMIOExtensionStreamSource (which is the var _streamSource in ExtensionDeviceSource).
Let’s replace the entirety of func startStreaming() with this:
func startStreaming() {
    guard let _ = _bufferPool else {
        return
    }

    guard let bundleURL = Bundle.main.url(forResource: "Clean", withExtension: "jpg") else {
        logger.debug("Clean.jpg wasn't found in bundle, returning.")
        return
    }

    guard let imageData = NSData(contentsOf: bundleURL) else {
        logger.debug("Couldn't get data from image at URL, returning.")
        return
    }

    guard let dataProvider = CGDataProvider(data: imageData) else {
        logger.debug("Couldn't get dataProvider of URL, returning")
        return
    }

    guard let techDiffCGImage = CGImage(jpegDataProviderSource: dataProvider, decode: nil, shouldInterpolate: false, intent: .defaultIntent) else {
        logger.debug("Couldn't get CG image from dataProvider, returning")
        return

    }

    guard let techDiffBuffer = pixelBufferFromImage(techDiffCGImage) else {
        logger.debug("It wasn't possible to get pixelBuffer from the techDiffCGImage, exiting.")
        return
    }

    _streamingCounter += 1

    _timer = DispatchSource.makeTimerSource(flags: .strict, queue: _timerQueue)
    _timer!.schedule(deadline: .now(), repeating: Double(1 / kFrameRate), leeway: .seconds(0))

    _timer!.setEventHandler {
        var err: OSStatus = 0
        let now = CMClockGetTime(CMClockGetHostTimeClock())

        var sbuf: CMSampleBuffer!
        var timingInfo = CMSampleTimingInfo()
        timingInfo.presentationTimeStamp = CMClockGetTime(CMClockGetHostTimeClock())

        var formatDescription: CMFormatDescription?

        let status = CMVideoFormatDescriptionCreateForImageBuffer(allocator: kCFAllocatorDefault, imageBuffer: techDiffBuffer, formatDescriptionOut: &formatDescription)
        if status != 0 {
            logger.debug("Couldn't make video format description from techDiffBuffer, exiting.")
        }
        if let formatDescription = formatDescription {
            err = CMSampleBufferCreateReadyWithImageBuffer(allocator: kCFAllocatorDefault, imageBuffer: techDiffBuffer, formatDescription: formatDescription, sampleTiming: &timingInfo, sampleBufferOut: &sbuf)
        } else {
            logger.debug("Couldn't create sample buffer from techDiffBuffer, exiting.")
        }

        if err == 0 {
                self._streamSource.stream.send(sbuf, discontinuity: [], hostTimeInNanoseconds: UInt64(timingInfo.presentationTimeStamp.seconds * Double(NSEC_PER_SEC)))
        } else {
            os_log(.info, "video time \(timingInfo.presentationTimeStamp.seconds) now \(now.seconds) err \(err)")
        }
    }

    _timer!.setCancelHandler {}
    _timer!.resume()
}
You can see that what we are doing here is loading in some image data and getting a CVPixelBuffer from it so we can .send(...) it to our output stream. Add the function that will get the pixel buffer with the correct attributes:
func pixelBufferFromImage(_ image: CGImage) -> CVPixelBuffer? {
    let width = image.width
    let height = image.height
    let region = CGRect(x: 0, y: 0, width: width, height: height)

    let pixelBufferAttributes: NSDictionary = [
        kCVPixelBufferWidthKey: width,
        kCVPixelBufferHeightKey: height,
        kCVPixelBufferPixelFormatTypeKey: _videoDescription.mediaSubType,
        kCVPixelBufferIOSurfacePropertiesKey: [:],
    ]

    var pixelBuffer: CVPixelBuffer?
    let result = CVPixelBufferCreate(kCFAllocatorDefault,
                                     width,
                                     height,
                                     kCVPixelFormatType_32ARGB,
                                     pixelBufferAttributes as CFDictionary,
                                     &pixelBuffer)

    guard result == kCVReturnSuccess, let pixelBuffer = pixelBuffer,
          let colorspace = image.colorSpace else {
        return nil
    }

    CVPixelBufferLockBaseAddress(pixelBuffer,
                                 CVPixelBufferLockFlags(rawValue: 0))
    guard let context =
        CGContext(data: CVPixelBufferGetBaseAddress(pixelBuffer),
                  width: width,
                  height: height,
                  bitsPerComponent: image.bitsPerComponent,
                  bytesPerRow: image.bytesPerRow,
                  space: colorspace,
                  bitmapInfo: CGImageAlphaInfo.noneSkipFirst
                      .rawValue)
    else {
        return nil
    }

    context.draw(image, in: region)

    CVPixelBufferUnlockBaseAddress(pixelBuffer,
                                   CVPixelBufferLockFlags(rawValue: 0))

    return pixelBuffer
}
Build and run, and use the application to uninstall your old extension, reboot, and use your app again to install your new extension. Now we will look at how to use lldb to debug your live extension.
Our friend LLDB #
When you run this version of the extension, by selecting it in FaceTime, you will see that it almost works, but that it doesn’t quite. The technical difficulties image is shown in the camera, but in mirror image.
We could make ourselves miserable by futzing with our extension code blindly and then rebooting endlessly to see the results, but we won’t. Instead, let’s attach the Xcode version of the lldb debugger to our extension while it is running in FaceTime and do some diagnosis. While FaceTime is using the extension, get its pid by opening Terminal.app and running pgrep com.politepix.OffcutsCam.Extension (replacing my organization ID with yours). Open Xcode and choose Debug->Attach to Process by PID or Name… and enter that PID, and choose “root” as the account to debug with.
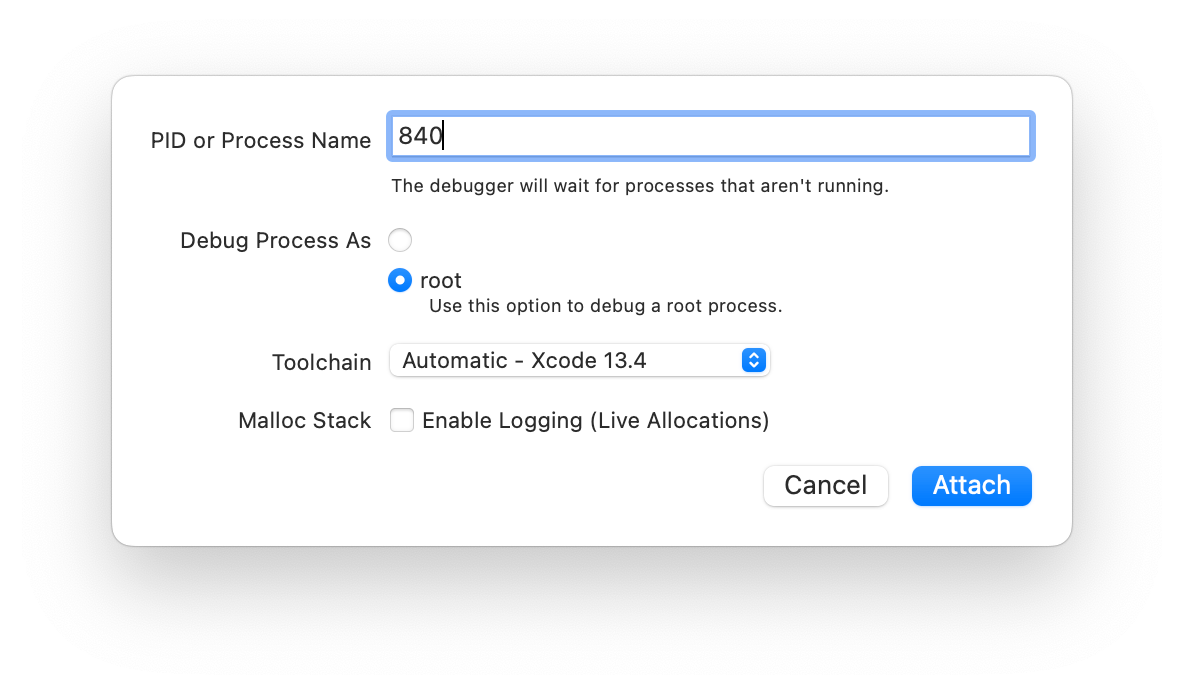
You will be asked to authenticate with an admin account and then Xcode will attach to your extension. Since you have its project open, and you built it with debug symbols, we can put breakpoints into ExtensionProvider.swift and inspect our variables directly in Xcode. Let’s do perhaps the single most important Xcode lldb trick we can learn for video extension debugging, and quicklook the contents of a pixelbuffer. Place a breakpoint right before this line in func startStreaming():
_streamingCounter += 1
Now go to FaceTime, select a different camera than ours, and then reselect our camera. In Xcode, your project should break at the breakpoint you set.
Check it out, we’re live-debugging our installed extension. Let’s open the debugger pane at the bottom of Xcode. Expand the left side if it isn’t already expanded. This is the variable viewer. You should see the object techDiffBuffer. Select it by clicking on it.
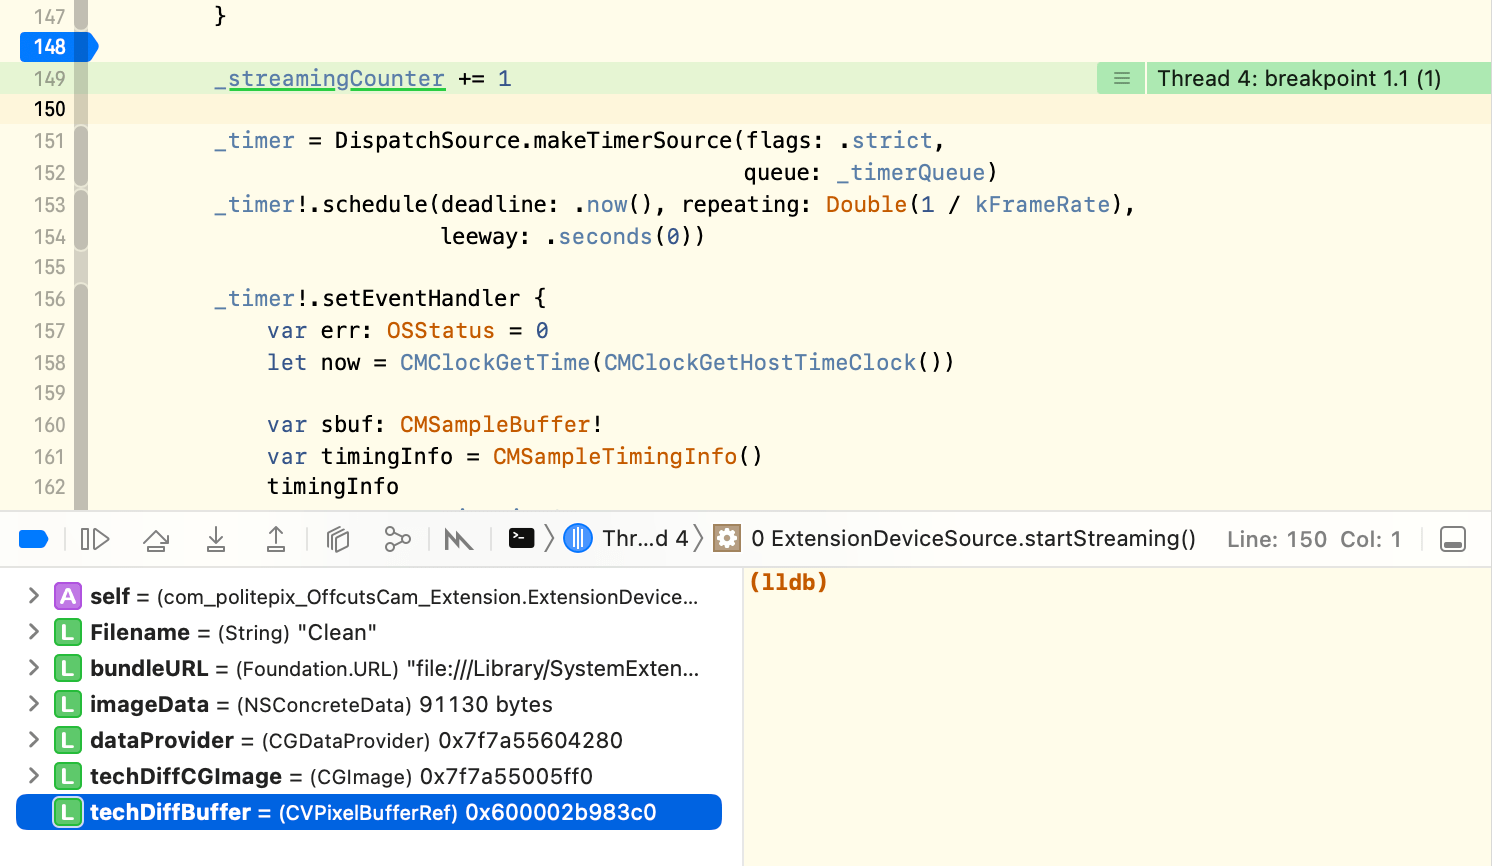
Now, with it selected in the variable viewer, press the space key. Whoa, you should see a whole image in that quicklook window. Xcode can show you the image contained in a pixel buffer! You can even choose to open it as an image in Preview.app. Once you’re writing effects, this is going to come in handy.
Hmm, the contents of the buffer look correct. This means that the camera output stream is being displayed in a different coordinate space after it leaves the extension.
We probably have to try out some code approaches here. We have two legs of our debugging available: we know how to use unified logging to see live extension console output, and we know how to set breakpoints and examine variables in the live extension in Xcode’s lldb debugger. But this is not quite enough to save us from reboot hell, because we still can’t change code and see results right after building.
The last and most important leg of our extension debug practice is an end-to-end testing app.
Ending reboots using an end-to-end testing app #
Add a macOS app target to your project called OffcutsCamEndToEnd. Open this new target’s ContentView.swift and replace its entire contents with this:
import CoreMediaIO
import SwiftUI

// MARK: - ContentView

struct ContentView {
    @ObservedObject var endToEndStreamProvider: EndToEndStreamProvider
}

extension ContentView: View {
    var body: some View {
        VStack {
            Image(
                self.endToEndStreamProvider
                    .videoExtensionStreamOutputImage ?? self.endToEndStreamProvider
                    .noVideoImage,
                scale: 1.0,
                label: Text("Video Feed")
            )
        }
    }
}

// MARK: - ContentView_Previews

struct ContentView_Previews: PreviewProvider {
    static var previews: some View {
        ContentView(endToEndStreamProvider: EndToEndStreamProvider())
    }
}

// MARK: - EndToEndStreamProvider

class EndToEndStreamProvider: NSObject, ObservableObject,
    ExtensionDeviceSourceDelegate {
    // MARK: Lifecycle

    override init() {
        providerSource = ExtensionProviderSource(clientQueue: nil)
        super.init()
        providerSource
            .deviceSource = ExtensionDeviceSource(localizedName: "OffcutsCam")
        providerSource.deviceSource.extensionDeviceSourceDelegate = self
        providerSource.deviceSource.startStreaming()
    }

    // MARK: Internal

    @Published var videoExtensionStreamOutputImage: CGImage?
    let noVideoImage : CGImage = NSImage(
        systemSymbolName: "video.slash",
        accessibilityDescription: "Image to indicate no video feed available"
    )!.cgImage(forProposedRect: nil, context: nil, hints: nil)! // OK to fail if this isn't available.

    let providerSource: ExtensionProviderSource

    func bufferReceived(_ buffer: CMSampleBuffer) {
        guard let cvImageBuffer = CMSampleBufferGetImageBuffer(buffer) else {
            print("Couldn't get image buffer, returning.")
            return
        }

        guard let ioSurface = CVPixelBufferGetIOSurface(cvImageBuffer) else {
            print("Pixel buffer had no IOSurface") // The camera uses IOSurface so we want image to break if there is none.
            return
        }

        let ciImage = CIImage(ioSurface: ioSurface.takeUnretainedValue())
            .oriented(.upMirrored)

        let context = CIContext(options: nil)

        guard let cgImage = context
            .createCGImage(ciImage, from: ciImage.extent) else { return }

        DispatchQueue.main.async {
            self.videoExtensionStreamOutputImage = cgImage
        }
    }
}
Change anything that loads ContentView() to load it like this:
ContentView(endToEndStreamProvider: EndToEndStreamProvider())
You can see that we are trying to start ExtensionProvider as it is started in the extension’s main() function, but attempting to substitute for the parts we have no access to.
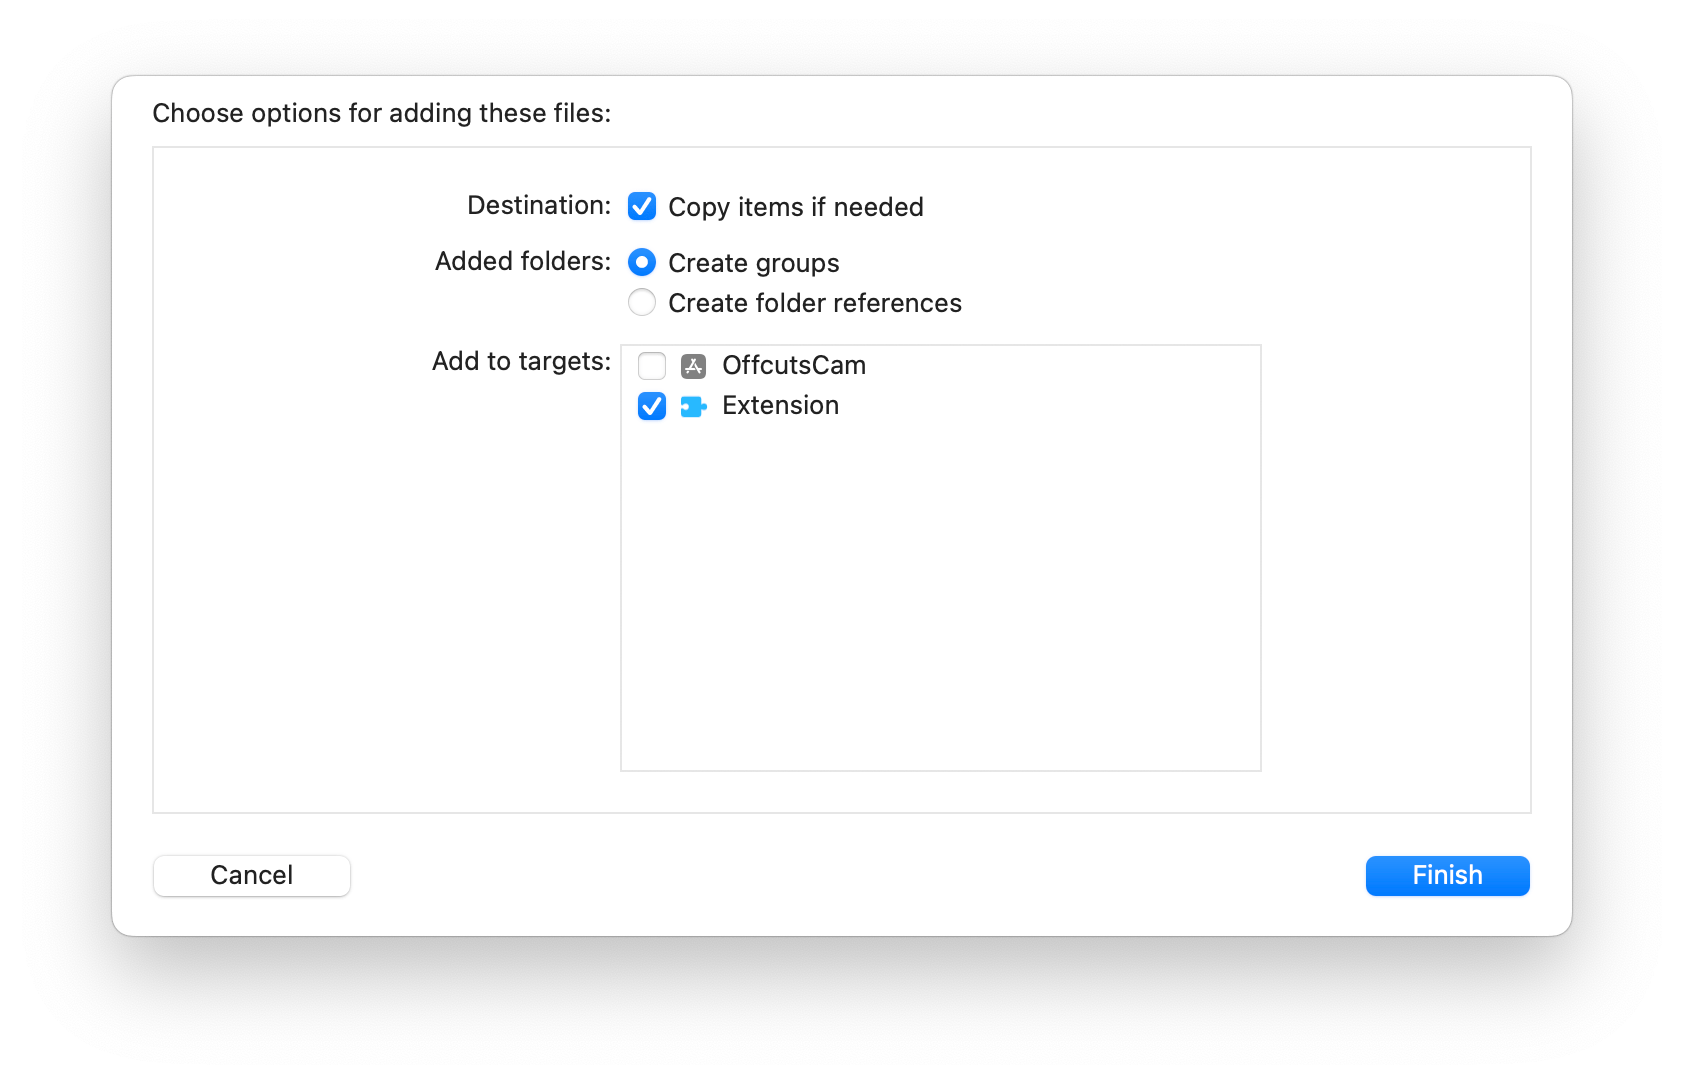
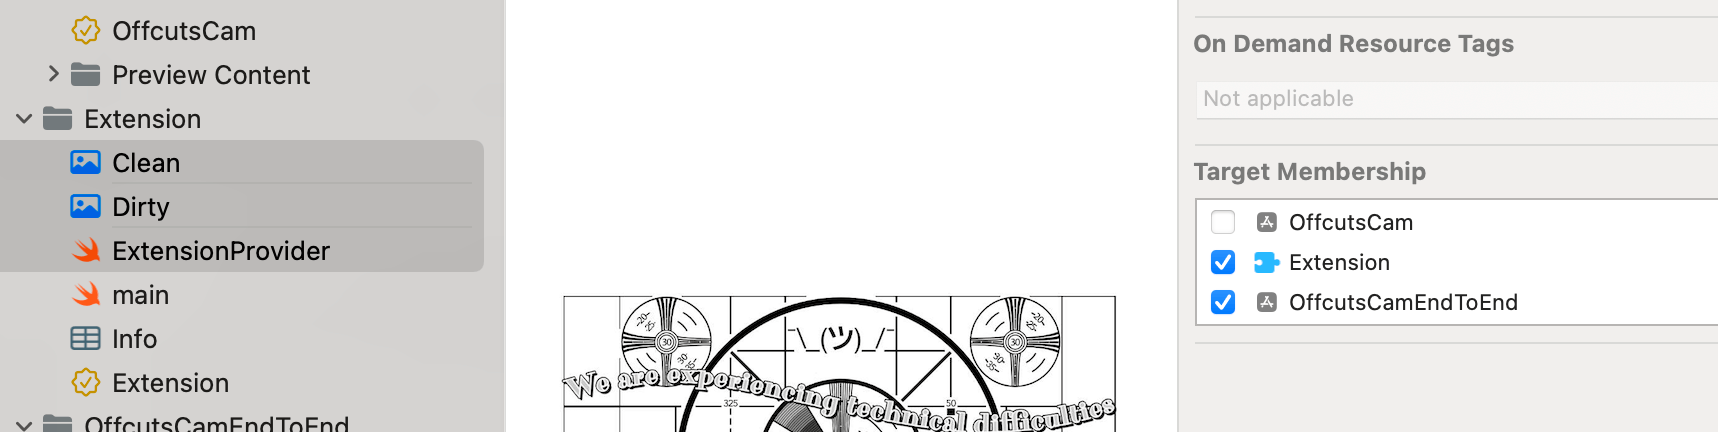
In the navigator, select the files Clean.jpg, Dirty.jpg, NotificationName.swift, and ExtensionProvider.swift and add them to the new target:
In ExtensionProvider.swift, make the following small changes so we can receive the camera’s buffers in our end-to-end app.
Add this protocol to the top of the file:
protocol ExtensionDeviceSourceDelegate: NSObject {
    func bufferReceived(_ buffer: CMSampleBuffer)
}
and add this delegate and boolean to your class ExtensionDeviceSource:
public weak var extensionDeviceSourceDelegate: ExtensionDeviceSourceDelegate?
private var _isExtension: Bool = true
Add this to init(localizedName: String) of ExtensionDeviceSource right after super.init():
guard let bundleID = Bundle.main.bundleIdentifier else { return }
    if bundleID.contains("EndToEnd") {
        _isExtension = false
    }
and change this:
 self._streamSource.stream.send(sbuf, discontinuity: [],
                               hostTimeInNanoseconds: UInt64(timingInfo
                                   .presentationTimeStamp
                                   .seconds *
                                   Double(NSEC_PER_SEC)))
to this:
if self._isExtension { // If I'm the extension, send to output stream
  self._streamSource.stream.send(sbuf, discontinuity: [], hostTimeInNanoseconds: UInt64(timingInfo.presentationTimeStamp.seconds * Double(NSEC_PER_SEC)))
} else {
   self.extensionDeviceSourceDelegate?.bufferReceived(sbuf) // If I'm the end-to-end testing app, send to delegate method.
}
Now we can send the buffers to the output stream when the ExtensionProvider is in a camera extension, and send them to the end-to-end app when we run it directly. We want to attempt to make the end-to-end app behave as similarly as possible to the CMIO Camera Extension output stream, so we can use it for as much video debugging as possible. If you now build and run the end-to-end app, you should see it break on our last breakpoint we sent in ExtensionProvider.swift.
Remove the breakpoint and continue. You should see our image in the app, flipped on its vertical axis just like in our video feed. Now we can debug the extension code as if it were an app.
I am going to add a transform to the ExtensionDeviceSource function func pixelBufferFromImage(_ image: CGImage) -> CVPixelBuffer?. I will replace the line context.draw(image, in: region) with this:
var transform = CGAffineTransform(scaleX: -1, y: 1) // Flip on vertical axis
transform = transform.translatedBy(x: -CGFloat(image.width), y: 0)
context.concatenate(transform)

context.draw(image, in: region)
Now when I run the end-to-end testing app, I see my image oriented correctly. You can build and run a new OffcutsCam.app and install the fixed extension since image debugging is done for now, and you should see it working.
The end-to-end app tool has some maintenance attached to it. The goal is that it should do very little, but what it does should approximate what the system does with the camera’s output stream, with the same requirements and behaviors. That’s why it creates its image from an IOSurface and not from the CVPixelBuffer, for instance, because if the CVPixelBuffer was lacking an IOSurface, and that is possible in a valid CVPixelBuffer, we could successfully make an image from it in our end-to-end testing app, but we would not get an image in FaceTime when using our camera, because the camera system passes IOSurface for efficiency.
My first expected maintenance of this tool: I suspect my vertical-axis flipping in the end-to-end app isn’t correct for pixel buffers that originate from AVCaptureSession video, so I foresee a future improvement in which, instead of flipping the image, it complains when a pixel buffer was created with the wrong format or properties that would result in being in the wrong coordinate space once it gets to the camera system. But, it’s a lot easier to do that research and experimentation now.
Changing the extension by using the container app, finally #
Now we can finally have the app talk to the extension and make a change in it. We will test this in the end-to-end testing app, and once it is working, we’ll reboot and view it in the actual extension.
In ExtensionProvider.swift, go to private func notificationReceived(notificationName: String) and, under case .changeImage:, replace the two logging lines with this:
self.deviceSource.imageIsClean.toggle()
logger.debug("The camera extension has received a notification")
logger.debug("The notification is: \(name.rawValue)")
self.deviceSource.stopStreaming()
self.deviceSource.startStreaming()
Give ExtensionDeviceSource this var:
var imageIsClean = true
And replace these lines in func startStreaming():
guard let bundleURL = Bundle.main.url(forResource: "Clean",
                                      withExtension: "jpg") else {
    logger.debug("Clean.jpg wasn't found in bundle, returning.")
    return
}
with these:
let Filename = imageIsClean ? "Clean" : "Dirty"

guard let bundleURL = Bundle.main.url(forResource: Filename,
                                      withExtension: "jpg") else {
    logger.debug("Clean.jpg wasn't found in bundle, returning.")
    return
}
Now, when we run the end-to-end testing app and run OffcutsCam.app, clicking Change Image shows us a change of image. We can toggle between a dirty and a clean version of the technical difficulties placard.
Reboot and install the extension once it is debugged #
Since we seem to have a working implementation, let’s build and run a new OffcutsCam.app (not the end-to-end testing app), uninstall the old extension, reboot, and install a new extension.
It works! Well, mine works; yours might need some more debugging. Good thing you know how to use unified logging, Xcode lldb, and an end-to-end testing app to debug your CMIO Camera Extension with (almost) no reboots. You can take a look at my working version on Github, remembering to change all incidences of team ID and organization ID from mine to yours.
Now that we know how to make a software camera extension with communication from its container app, and we know how to debug, next up will be fun stuff, in part 3 of my CMIO Camera Extension Series: building a creative camera with realtime effects processing using vImage Pixel Buffers, which can use the Continuity Camera Webcam.
Extro #
✂ - - Non-code thoughts, please stop reading here for the code-only experience - - ✂
More video debugging, more Epictetus. Excerpt:
“It is the part of an uneducated person to blame others where he himself fares ill; to blame himself is the part of one whose education has begun; to blame neither another nor his own self is the part of one whose education is already complete.”
He was a stoic, so what he probably meant was that we can’t control external things, only what we make of them (and education is learning this fact). Meaning, at the stage in which we have no control over what we make of the impressions in our brains, and too much belief in the idea that people are directly in control of external events, we blame the person outside of ourselves closest to a negative outcome. With a little control over ourselves, we blame ourselves for not having enough control over ourselves. When we truly understand that the only influence we can claim to reliably have over reality is the reality in our interpretation of our perceptions, we blame no one.
I am not a stoic, so my understanding is: we first react to injury without any compassion, and later we are able to demonstrate compassion for another. The next stage would be to include ourselves and another in the same compassion, where it isn’t a demonstration.
Someone else might say “First you think those perspectives are opposite, then you think they’re just orthogonal, then you notice that they overlap…”
Share this post: